

Early in our years of learning about traditional foods kombucha came on our radar. It is a traditional drink from Russia that has been around for centuries. Kombucha seemed easy, so I gave it a try. Make sweet black tea, ferment with a SCOBY, drink! Simple enough, right?
At the time it was hard for me to fit kombucha making into the schedule and I didn’t really know what good kombucha should look like or taste like. It always seemed to turn to vinegar on me and I didn’t know how to get something that was refreshing, fizzy, and tasty. I also only knew one other person making it who was not getting the best results either.
So, kombucha went on the back burner for many years, or rather the back of the pantry! My jars of scobies sat untouched for a couple years in a dark corner of the pantry.
During that time, in all my learning about health and nutrition, kombucha was always knocking on the door of my mind because it’s so good for you!
There is a story in Nourishing Traditions by Sally Fallon about an industrial region of Russia where pollution was so bad that cancer rates were very high. Yet one village in the area didn’t get cancer like the other villages!
So, Russian researchers investigated and found that the local folks there drank kombucha – fermented sweet black tea – every day. It contains organic acids and nutrients that boost our bodies’ natural detoxification and it kept the Russian villagers healthy despite such a polluted environment!

When I worked up the will to try making kombucha again, I found that my jars of scobies had finally gone bad in the pantry.
My only friend who made kombucha had another friend who was making it successfully, so I got a couple scobies from her a few years ago and started trying again.

With much trial and error and good advice from others, we’ve learned how to make the most delicious and refreshing and fizzy kombucha! We often take it to church potlucks, other people’s homes, etc. Most people who try it just love it, so I thought I’d better share how we make it!
Our favorite flavors of kombucha are Valiant Grape (like Concord), Kerr Apple, Red Sparkle Apple, pomegranate, and ginger! We can many our own juices from grapes and apples and it’s so much fun to try the different varieties as kombucha flavors!
Years ago we found EZ Cap bottles at our local brewery/wine store. When we increased our kombucha brewing we needed more and found the EZ Cap bottles at their website.
Without further ado, here is how we make kombucha at Norkenzie Farms…
Refreshing Fizzy Kombucha (Large Batch)
Ingredients
- ~9 liters pure water
- 9 heaped teaspoons organic black tea (or 9 tea bags)
- 3 heaped teaspoons organic green tea (or 3 tea bags)
- 3 cups sugar
- ~5 cups juice (for flavor in second fermentation, *optional)
Instructions
1. Boil ~ 1 gallon water.
2. While water comes to a boil, put tea leaves and sugar in a 1-gallon glass jar.
3. Pour boiling water over tea leaves and sugar. Mix well until sugar dissolves. Let steep until warm or room temperature.
4. Strain tea concentrate and divide equally between three 1-gallon jars.
5. Top up three jars with remaining room-temperature pure water to just below the shoulder so the jars are all about ¾ full.
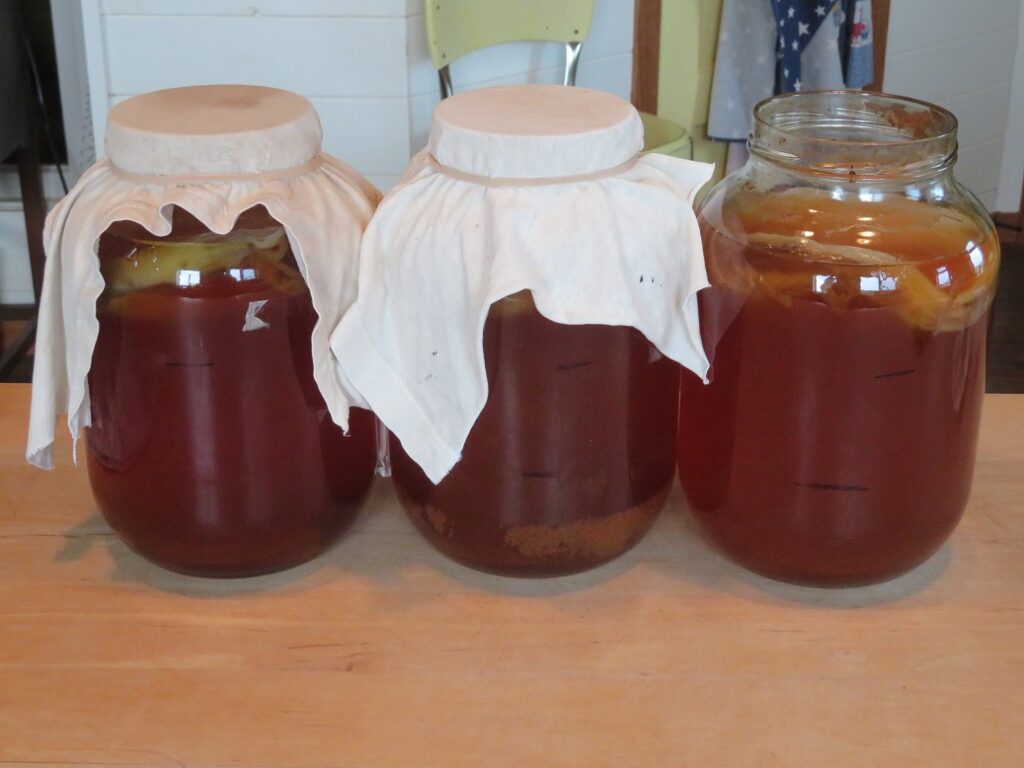
6. Add a ½ to 1-inch thick scoby to each jar. Let ferment at room temperature for 1 week.
7. Wash hands, remove scobies from jars and set aside on a clean glass plate or baking dish.
8. If you wish to drink kombucha after the first fermentation, you can store in the fridge at this
point and it will not have any fizz. We always do a second fermentation to add refreshing fizz and flavor!
Instructions for second fermentation:
1. Using a funnel, add a shy ½ cup of juice to each 1-liter bottle.
2. Top up each bottle with kombucha, leaving 3-4 inches of head space.
3. Cap bottles and leave at room temperature to ferment for another 24-48 hours (we do 48 hours and most bottle get nice and fizzy with that amount of time).
4. If your kombucha is not as fizzy as you’d like, let it continue fermenting at room temperature for longer, checking once or twice daily by opening the cap a little. If you check too often, you will lose pressure and it won’t be as fizzy.
Notes
1. Use R.O. (reverse osmosis) water, structured if possible. Our kombucha fermentation time sped up w/ the switch to structured R.O. water and the scoby grows faster, too! If you don't have R.O. water and your tap water doesn't work well for fermenting, try distilled water.
2. Valeria of Beets & Bones recommends not adding any of the kombucha liquid as “starter” but just the scoby (see link below). This has worked very well for us.
3. Fermenting time depends on room temperature. We keep our kombucha jars near the wood stove, so in winter, the first and second fermentation take about the same amount of time as in summer months with a warmer room temperature.
4. Metal or plastic utensils should never come in contact w/ the scoby. Use glass only for fermenting and storing kombucha.
5. Always use glass bottles that are rated for storing liquids under high pressure. We use the EZ Cap bottles and have had good success with those.
6. If you do not need to make a large batch of kombucha, you can divide this recipe into thirds – 1/3 gives ~3 1-liter bottles and 2/3 gives ~6-7 1-liter bottles.
7. If you want to have extra kombucha to drink for guests or hot summer weater, plan ahead by a couple weeks so you have it ready to drink in the fridge!
Making kombucha came with much trial and error and also some great tips from others who have more experience than we do! These are two other blog posts we found very helpful in learning to make kombucha:
The Healthy Home Economist – Kombucha Tea
A drink as healthy as kombucha is worth your time to learn to make, even if it takes a few months or years to get very good at it! The commercial brands are not always good for you due to high sugar content. Check ingredients lists! Or buy homemade kombucha from a friend who makes it already!

Leave a Reply